Tuesday, May 27, 2008

No-Knead Bread: Regular or Fresh Ground

Over the last couple of years we've gone from regular store-bought white bread to grinding our own wheat berries and baking fresh bread several times each week. Having a good recipe for sandwich bread helps. It's even gotten to the point where I keep at least three types of wheat on hand; using hard red winter wheat or hard white wheat for breads and soft white wheat for pastry, biscuits, and cakes. But until last month when I stumbled across Jim Lahey's No-Knead Bread, I still couldn't make a crusty, holey loaf of rustic bread that was equivalent or better than a bakery-made loaf. (Loaf made with unbleached flour pictured in photo to left.)

All that's changed now. And almost better than the bread itself is the fact that it's incredibly easy to make. No kneading. Not a bit. The hardest part is getting the timing down as you need to start the process 15 to 21 hours ahead of when you want to take the loaf out of the oven. But that initial calculation is all the work there is -- you mix up the ingredients, cover and let sit on the counter for 12 to 18 hours, roll the dough out of the bowl and pretty much let it sit for another 2 hours, roll into the pre-heated pan and bake. That's it.

The method works fairly well with fresh ground wheat, too. There are a few differences in the loaves -- the wholegrain bread won't rise as high, the crust won't be as shatteringly crunchy and the texture won't be quite as open. However, two improvements I find when using fresh ground wheat are that the bread stays fresher longer (doesn't dry out as fast) and the taste is improved. That last one is true for all wholegrain bread, I think.

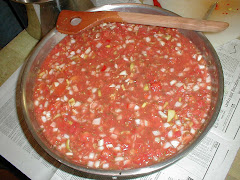
Here's the recipe for my fresh ground wheat version (shown in photo above right). Check out the link above for the story of Lahey's method development or go straight here for his recipe for the loaf made with all-purpose or unbleached flour.

No-Knead Wholegrain Bread

3 cups fresh ground hard wheat flour, more for dusting
1/4 teaspoon Saf-instant yeast
1-1/4 teaspoons salt

Mix flour, yeast and salt together in a big bowl. Add 1-1/2 cups water. Stir until blended. Cover bowl with plastic wrap. Let bowl sit on countertop at room temperature. Surface of dough will be dotted with bubbles when it's ready for the next step -- allow at least 12 hours, preferably 18.

Lightly flour clean countertop or other work surface and place dough on it; sprinkle a little more flour over dough and fold it over on itself once or twice. Lay plastic wrap left from covering bowl over dough and let rest for 15 minutes.
Using just enough flour to keep dough from sticking to counter or fingers, gently and quickly shape dough into a ball. Generously coat a cotton towel (do not use a textured towel like terry) with extra flour. Place dough on towel and dust top of dough with more flour. Cover with another similar cotton towel and let rise about 2 hours.

Preheat oven to 450F. at least 30 minutes before dough is ready. Put a 6- to 8-quart heavy covered pot (cast iron, enamel, Pyrex or ceramic -- I used large Corning Ware dish shown in pictures above) in oven as it heats. When ready to transfer dough to pot, remove pan from oven, slide one hand under towel and flip dough over into pot. It will look messy. Shake pan bake and forth once or twice if dough is unevenly distributed. It will shape up as it bakes. Cover with lid and bake 30 minutes, then remove lid and bake another 15 minutes or until loaf is browned. Turn out onto a rack to cool.

For all kinds of kitchen tips including more recipes, check out Tammy's Recipes.com Kitchen Tip Tuesdays column. There's a discussion about grain mills going on, too, in case you're thinking about grinding your own wheat.

Wednesday, May 21, 2008

Garden Update

May has been a great month for the garden. May 10 is the ballyhooed last frost date around here and it's been and gone with nary a sign of low 30s temps. Granted the nights are still in the 40s but those temps coupled with the fairly regular rains have given us a good early growing season. The picture above shows a partial view of the garden looking away from the house towards the sheep field. Green cabbage (Stonehead) is in the middle, the beds to the right hold sugar snap peas along the rear, peppers (bell and pepperocini) to the front and a little lettuce (cos) and various herbs tucked in here and there. Some yellow storage onions (Globe, I think) are in beds to each side near the back of the "U" and Irish potatoes are partially visible in the row to the left (summer squash and cucumbers are in the hidden part of that row).

Broccoli, red cabbage, beets and potatoes (Kennebec, Pontiac and Yukon Gold) are in the far back, stretching almost to the fence line. Green beans, tomatoes, and the spot for corn (not yet planted) are out of view over to the left. Pole beans are up, too, and are all the way over to the left at the back. The crossed poles are just barely visible in the big picture.

The broccoli is so close to being ready I almost can't stand it.

If I didn't know DH checks it every day, I'd run out there and pick one for breakfast before everyone else is up.

The walking or Egyptian onion is loaded with bulblets (or are they bulbils, like with rocambole garlic?) and I can see we'll need to rethink its position. I'm wondering if I would prefer it in one of my flower beds -- maybe as an edging in front of something tall? I'm glad it's doing so well since I've had several requests from friends and family for their own plants. To help supply the demand, DH bought a dozen sets (spent a whole $1!) from a vendor at the Charlottesville Farmer's Market last month and they're coming along, planted in a bed next to the yellow onions.

My lovage, the bushy plant in the right front corner of the picture to the left*, is going on three years old and could be divided this year. I'm thinking it would make a nice foliage plant in one of the flower beds, too. A member on FFF, didee, suggested candying lovage stems like angelica. She said it wasn't as good as the "real" thing but would do in a pinch. Since I can't seem to find any angelica locally (was hoping Buffalo Springs would have it but unfortunately they've closed their doors for good) it may be worth the try with lovage. I love to use the stems as straws in homemade vegetable juice cocktails.

Inspired by the Devraes family "100 foot diet" challenge, we're trying to measure our food production this year. However, it's going to be a little hard with the strawberries as, short of weighing DS before and after picking, we're not going to know our true strawberry yield. He assures me that they are all delicious and invariably offers to share so I can't really complain. Saves me having to top them, right?


Tracking the vegetable production doesn't seem to present as much problem. We're at 12 pounds of asparagus, 9 pounds of lettuce and almost 8 pounds of spinach so far. Radishes harvested number 66 and counting. Until this past week, all that came from the two cold frames DH set up earlier this year.

Rhubarb I forgot to weigh. Sigh. But I gathered it in 5-gal. buckets by standing the stalks on end and packing them in very tightly. Measured that way we had 3 full buckets and about a dozen extra stalks. It's still producing, too.

*That reads too much like the old Johnny Cash song...

Tuesday, May 6, 2008

What do you do with rhubarb?

Maybe I shouldn't ask that question because if DH and DS are any indication, many people might tell me something I don't want to hear. That's changing at our house, however. This year I finally made a rhubarb jam that they can't get enough of -- DH even said not to bother making other types while DS indicated he really liked it, too, but doesn't want us to forgo making grape jelly since he prefers that with his peanut butter sandwiches.

My mother always makes stewed rhubarb and while I like that now, it wasn't a big favorite as a kid. Tastes change, though, and now I can't wait for the first rhubarb each spring. Even DH and DS enjoy it as part of a fruit juice blend or a slightly sweeter fruit punch. Fruit leather is always a hit for a snack and we all like a rhubarb coffee cake or rhubarb upside down cake.

Sometimes I make a sweet bread dough and roll it out as a rectangle, spread sweetened cream cheese topped with rhubarb preserves or just sweetened stewed rhubarb down the middle and then cut the sides and lay over the filling as a braid. Last year I made all-rhubarb preserves and found that DH and DS didn't care for that -- I slowly used it up as a filling for the braid or by mixing it half and half with homemade bbq or chili sauce and using for a sweet and spicy sauce in which to heat smoked sausage slices or little smokies. Same idea as the ubiquitous grape jelly and bbq sauce recipe everyone used to prepare for potlucks at work and almost any preserves will substitute, not just rhubarb.

Besides using fresh rhubarb, I freeze rhubarb by cutting into 1-inch pieces and storing in a freezer bag (no blanching necessary) or dry it in the dehydrator. Once frozen or dried, I can use it to make any rhubarb recipe I have from a punch to rhubarb preserves.

If you need something to do with the rhubarb leaves, try making stepping stones like these. Or dye some yarn -- haven't experimented with that yet but Jenny Dean's "Wild Color" even mentions using rhubarb leaves as a mordant when dyeing and several other books on my dyeing shelf provide lots of information on the dyeing process and colors to expect from rhubarb.

Rhubarb Jam

[Yes, this uses gelatin mix but the strawberries are only now blooming and I didn't want to wait. Besides, I consider the end result, DH and DS clamoring for more rhubarb preserves, to be worth the use of one lowly package of gelatin. You can try other flavors of gelatin -- I recommend raspberry as a great substitute.]

8 cups chopped rhubarb
4 cups granulated sugar
3-oz. package strawberry-flavored gelatin

Put the rhubarb in a large heavy pot (at least 4-qt size or use stockpot) and pour sugar over top. Cover with lid and let stand at room temperature overnight.

When ready to prepare, bring the rhubarb and sugar to a boil over medium heat. Boil, stirring constantly, for 12 minutes over low heat. Remove from heat and stir in dry gelatin powder. Transfer to sterile jars and refrigerate or process for 10-minutes in boiling water bath canner.

My yield for one batch of this recipe was 7 half-pint jelly jars with about 1/2 cup leftover for tasting. This will be slightly runny or what I call "spoonable" but should firm up a bit more after opening and subsequent refrigeration.

Stewed Rhubarb

Start with any amount of chopped rhubarb you'd like to cook. It will reduce in volume so I suggest starting out with 3 or 4 cups at a minimum.

Place in heavy-bottomed pan and add a few tablespoons of water. Cook over medium heat, stirring occasionally, for about 30 minutes or until rhubarb is soft. Check to see if additional water is necessary at the outset. Once the rhubarb starts to cook it releases liquid so you don't want to add extra if you can help it.

Add sugar at the last. If you started with 4 cups of rhubarb, add 1/2 cup sugar, stir to dissolve and blend and taste. Add more sugar as needed. I usually like about a 1 part sugar to 6 parts rhubarb but it's a highly individual call. You could also use strawberry jam to sweeten.

Serve as a side dish, a dessert sauce over pound cake or on toast for breakfast.

Rhubarb Fruit Punch

4 quarts chopped rhubarb
4 quarts water
2 12-ounce can frozen orange juice concentrate
3 cups pineapple juice
2 cups granulated sugar
1 3-ounce package strawberry or raspberry gelatin powder

Cook rhubarb in water till soft. Press through sieve and add remaining ingredients, stirring to dissolve and blend. Serve chilled. Can be frozen.

You can also make plain rhubarb juice as directed in the first part of recipe. Use as part of the liquid when making lemonade or sweeten and serve as Rhubarb-Ade.

Strawberry-Rhubarb Leather

2 cups chopped rhubarb
1/4 cup water
2 cups strawberries, sliced
1/2 cup sugar

Combine finely chopped rhubarb and water. Simmer over medium heat for about 5 minutes. Add strawberries and sugar. Simmer another 5 minutes. Puree mixture until smooth in a blender or food processor. Dehydrate in a dehydrator or in oven.

To dry in an oven just set temp at lowest possible setting --about 140F. would be about right if you can set your oven this low. Dry until fruit feels leather like yet pliable. Best to use parchment paper laid out on cookie sheet to spread fruit on before drying in oven. Remove the leather while it is still warm and roll it up.

Rhubarb-Ginger Frozen Yogurt

3 cups chopped rhubarb
1/2-inch piece of fresh ginger, peeled and finely grated
1/4 to 1/2 cup sugar, adjusted to taste based on rhubarb tartness
16 ounces plain yogurt

Combine rhubarb, ginger and sugar in a pan and cover. Cook gently for 5 minutes, until the rhubarb is softening. Then remove the lid to allow any extra juices to evaporate. Taste and add a little more sugar, if needed. Put puree aside to cool.
Stir the yogurt then gently mix in the cooled rhubarb.

Freeze in an ice cream maker. Serve 4.

[Visit Kitchen Tip Tuesdays hosted by TammysRecipes.com for more great recipes and kitchen tips.]

Sunday, May 4, 2008

Helicopters, saw blades and chickens -- oh my!

A few weeks ago we had a message on the answerphone from our electric cooperative. They were going to have work crews in our area at the end of April and early May trimming trees along the power lines with a helicopter. Please call if we had livestock or other concerns. So I called.

Talked with a woman at the co-op about my concern for our chickens and possibly the sheep. They don't like loud motorcycles on the county road out front and the roos have a fit when the ultralights are flying in the 300-acre field behind the house. No vivid imagination required to consider how they might react to a helicopter with a massive chainsaw hovering nearby.

Explained that if we knew when they were going to be near us, we'd move the livestock or otherwise take action to assure they wouldn't freak. She couldn't tell me the schedule said she'd check with the other department and call back. She left another message later that day to say they weren't going to be "in our area" after all -- the original message was distributed to customers in several counties as a precaution and didn't apply to us.

So last Thursday we're all going about our usual morning chores. DH was mowing and DS was searching for just the right anthill from which to stock his ant farm and I was hanging laundry on the line. Kept hearing this drone off in the distance -- sounded like the ultralights but I couldn't see one. They're colorful and usually easy to spot. Plus it was a weekday and they only turn up on weekends or holidays for the most part.

Suddenly DS comes tearing through the house and into the backyard shouting that Dad wants me to "come quick." Coming in low, directly over the chickens in the electronet, is a helicopter loaded down with a 15-, 20-foot saw hanging by a cable. It's the tree-trimming helicopter that wouldn't be near us.

DH went inside and called the electric co-op to find out what was going on -- for one thing we don't even have any overhead utility lines on our property so why come directly overhead like that? Earlier information notwithstanding, it turned out they would be right next door where the lines run along our neighbors' driveway. DS was ecstatic. DH and I were worried.

The site manager pulled into our driveway minutes after DH got off the phone with the co-op manager. Apologies for misinformation were extended and he offered to stand by to catch escaping chickens if needed. Apparently the helicopter's earlier foray overhead was part of the wide arc it swings when leaving one spot and moving to the next. They'd give us an hour or two to get ready and then they'd come by right after lunch to trim the nearby trees.

DS had wanted to drive out in the county to see the helicopter at work ever since he'd heard the original phone message. Now he had his chance up close. We coaxed the chickens in with some popcorn and apple peels and prepared to watch the show.

The helicopter came in for three passes at trees near the power lines farther up the road. Then it came in close for the trees on the other side of the neighbors' driveway. Very impressive. When it moved farther into the neighbors' property I went to check on the chickens and DH and DS followed the work with binoculars.

The excitement ended when the crew moved on to the next site. The sheep came out of the barn to look around and the chickens settled down. DS began pulling books about helicopters from the shelves and listing related topics he wants to research at the library. Everything went back to normal on a warm May afternoon.

Saturday, May 3, 2008

More strawberries!

Last year DH ordered 50 strawberry plants and set up this nifty (8-ft square) tiered bed for them. This spring another homeschooling family offered their excess strawberry plants and DH added them to the bed. Now look at those blooms! Won't be long and we'll have berries ready to eat.
DH says he's not going to bother covering the bed with netting to keep the birds out but I'm betting when that first berry starts to turn pink he'll change his mind. Now if only there was a netting that would keep boys out of the berry patch, too.