I love oatmeal. When I was a kid my mother sometimes would fix Quick Quaker Oats for breakfast and I never complained. Warm oatmeal with a little milk and sugar and a piece of buttered toast is probably my favorite morning meal.
My grandmother usually prepared Old Fashioned Quaker Oats and I liked her breakfasts better but never gave much thought to why. When I first tasted porridge made with steel-cut oats I understood why I preferred my grandmother's oatmeal to the quick-cooking kind. I like oats! The old fashioned rolled oats are more like the real thing than the chopped up quick-cooking oatmeal. And don't even try to compare instant (ugh) to any of the other choices.
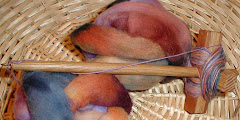
So now I begin preparing our morning cereal the night before. I soak a cup of oat groats (hulled whole oats) in water overnight and finish cooking them in the morning. They're very flavorful and a little chewy. They don't have to be soaked ahead of time but it cuts down on the morning cooking time which means we can eat breakfast sooner. Usually a good thing around here.
Oat Groats
Yield: 4 servings
1 cup oat groats
3-1/2 cups water
1/2 teaspoon salt
Rinse and drain groats if you wish. (I do if they seem dusty or appear to have chaff mixed in.)
Bring water to boil in heavy medium pan. Add salt and oat groats. Stir to combine. Boil for 5 minutes or cover and turn off heat immediately. Your choice. The 5-minutes of boiling will further reduce cooking time in the morning but isn't required. Set covered pan to side and leave out to soak overnight.
The next morning, return pan to heat and simmer till the water is absorbed and oats are tender. 15-20 minutes is about right but the process can take up to 45 minutes if the oats weren't soaked overnight.
Any leftover oats can be reheated for breakfast another day. (Store cooked oats in fridge.) Or add them to bread dough. I can incorporate 1/2 cup cooked grain in the basic doughs without fiddling with the other ingredient amounts. More than that and I may have to adjust liquid or flour amounts. YMMV
Variation:
If you like hot rice as a breakfast cereal as DS and I do, add 1/4 cup brown rice with the groats and increase water by 1/2 cup. It doesn't alter the flavor much but will add contrast to what may appear to be a bowl of plain brown grain. At least till you taste it and then the full oat-y flavor will burst forth. Yum.
For more recipes and kitchen ideas check out Kitchen Tip Tuesdays at TammysRecipes.com.
Tuesday, February 10, 2009
Saturday, February 7, 2009
Fifi rocks! Or, how to hatch eggs in the worst winter weather.
Late last spring we bought a bantam silkie pair and dubbed them Fifi and Mr. Fluff. Fifi almost immediately began to lay and went broody. In early June she hatched one bantam silkie pullet, Peep, two DominiqueX pullets, Brayer and Ares, and one AmeraucanaX cockerel, Squirrel. (We added fertile eggs to her clutch from the chickens in the portable electric netting as Mr. Fluff doesn't seem up to the task of covering the full-size backyard girls.)
After weaning* the first batch, Fifi went on to set another clutch resulting in two more DominiqueX pullets, Checkers and Chess, and one AmeraucanaX pullet, Bronwyn, hatching out in mid-September. Those are just now beginning to lay. Every day or two we find another mid-size egg (between Peep's bantam-size egg and the regular backyard girls eggs) in the nest box.
In mid-January, Fifi became broody again. She began gathering eggs, mainly hers and Peep's, around her and seemed prepared to set another batch. My mom was rather disappointed that we were unwilling to allow Fifi to keep her own eggs for hatching but as we can only house so many chickens around here, we wanted to increase the chance that any hatching chicks would be able to stay "at home" and not have to be sold as would be likely should we hatch more bantams. Thus DH gathered eggs from the electric net chickens and subbed them for Fifi's stash.
He was concerned that the eggs he placed this time, tho fertile, wouldn't have much chance of hatching, tho, as only one was still warm when he gathered it. The temps that week were hitting 0F. at night and seldom rising above 20F during the day. We had at least one egg freeze in the nest box before it could be collected. Didn't seem like the best time to be hatching but try telling that to a broody hen!
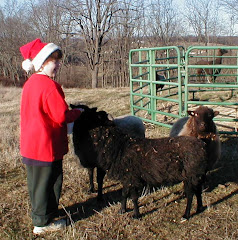
Fifi did her job as usual, however, and on Wednesday of this week DH spotted a little yellow head popping out from under her wing to see what was going on when he gathered eggs. It wasn't until Friday that we knew for sure she had two chicks. (DS is holding Fifi and DH has the two chicks in the photo.)
She'd started out with four eggs but late last week I found one egg pushed out of her nest, a foot or more away from her. It was cold and she made no demur when I picked it up. I wasn't positive it even had been under her until I checked it's contents and found what to me appeared to be a perfectly formed chick. Since she didn't object to my taking the egg I have to think she'd discarded it for some reason but don't know that for sure or why she would. And Wednesday, when DH spotted the first chick, he also found a still damp but out-of-the egg chick that was no longer living. Again, we don't know what happened to it tho we'd found one in the same condition from her second hatching, too. Nature can be hard sometimes but I wish I knew if it was something I could prevent in the future.
For now, Fifi and her two chicks are doing fine and we moved them into their own pen this morning so they can go in and out without worry of stray cats or other wildlife which can get into the backyard even tho it is fenced. Plus the other hens won't bother them nor eat all their feed as they're wont to do.
Our recent snow is melting as temps are expected to hit 55F. or even 60F. by tomorrow. If nighttime temps drop back to the teens, we can put a heat lamp in Fifi's house but when I looked out a few minutes ago she had already led the little chicks outside for a browse in the sunlit grass. Since this is her third time in the chick pen, I think she's comfortable with it and will go on to raise another fine brood of chicks. I'm just hoping they're both pullets...
*What is the correct term for when the mama hen begins to ignore her rapidly growing chicks?
Wednesday, February 4, 2009
Needle felted sheep

These little guys are fun to make. They only take one felting needle and about a 1/2 ounce of wool each.
I used a triangular needle, 38 gauge, but there are other types. Two were made from wool roving but the white sheep was made from washed fleece. The bit of pink-colored wool used inside the ears of two of the sheep came from a bit of Kool-Aid dyeing I did a while back. I used about 2 inches (total) of a 4-ply black tapestry wool yarn for forming the mouth and nose on each sheep. One of the sheep has two tortoise-shell beads sewn on for eyes. The others are waiting for me to find suitable small beads in my stash.
The process of needle felting is fairly simple. After deciding what you want to make, break the overall form down into a few basic shapes. (Yes, this is like those drawing lessons where you are to imagine heads as ovals or spheres, legs as cylinders, etc.) In the case of these sheep, each one required 9 individual pieces: 4 same-size cylinders for the legs, 1 large cylinder for the body, a somewhat cone-shape for the head, and 3 flat leaf-shaped pieces for the two ears and the tail.
Take small amounts of wool, mere wisps in many cases, and roll them into the shapes you need. For legs you may want to roll the wool around a wooden skewer or even a toothpick if the animal is small. Then use the felting needle to run through the wool. Over and over again.
You'll notice after the first few tries that the wool compacts where the needle penetrates it. The form will go from being loose and airy, like a light cotton puff, to being more firm. More like one of those cylindrical cotton pads a dentist uses to pack around a gum. Leave a bit of loose wool at the end of the leg where you plan to attach it to the body. Then needle that bit in and out to attach it securely.
Remember that the felting needle is very sharp and barbed. You don't want to accidentally run it through you in the process. Using a foam pad as a working surface is what's most often recommended.
The pad should be thick enough that the needle doesn't extend past the pad when poking it into the wool. Another reason for using a pad is that the action of the needle hitting a hard surface like a tabletop could cause the needle to break. High-density foam (available at some craft stores), upholstery foam such as used for couch cushions or firm pillow forms, and even the packing foam used for electronic equipment can work for this purpose. Just don't use styrofoam or similar substance that will crumble when penetrated by the felting needle.
Instead of a foam pad, I've been using a folded Shetland sweater I fulled in the washing machine. (The sheep are standing on it in the photo above.) Folded, it offers a decent surface for stabbing at the wool. Drawbacks, which haven't bothered me so far, are every so often I have to pick a few hairy strands of wool from the sweater off of the sheep piece I am working on and the working piece and pad can stick together like they've been velcroed if I'm not careful about pulling up the working piece every few jabs. The last problem isn't one for me as I like to turn the working piece in my hand after every few pokes with the felting needle to be sure it's felting evenly and that the shape is staying as I want it. Not flattening out, for example.
DH wants to try this craft and is determined he's going to make a llama so we can have a flock of needle felted sheep made from our sheep's wool with a guardian llama just like Andy, too. For me, I want to try working with some dyed wool, perhaps making a sun, moon and stars mobile or a fiery-faced sun with wool locks coming out from his head like sunbursts.
Later this month I'm going to do a short class on making these sheep for my fiber guild's meeting. Since the other members inspire me with their hand-dyed tops, lacy shawls, inkle-woven shoelaces, etc., I've decided to work up a white sheep/black sheep needle felted design for the yoke or bottom edge of a long-sleeve denim shirt I found at the thrift store last month. What better way to demonstrate the many uses of a felting needle, right?
Subscribe to:
Posts (Atom)