Friday, October 29, 2010

Cajun Cowboy Candy Pickles

Is that a mouthful to say or what?  But they taste good and are a sort of by-product of another session of canning.

A few months ago I posted about a tasty hot and dill pickle recipe a friend had shared called Cajun Pickles.   Then, last weekend in anticipation of our first frost, DH pulled up all the pepper plants in the garden.  So I've been busy putting up serrano, jalapeno, thai dragon and Fooled You peppers.  Some went into a ristra, some were spread on trays for drying, some were canned for later use in salsa or crockpot Italian beef, some went into more hot sauce and some went to another friend because I'd run out of ideas.

But I still had about 8 pounds of jalapeno peppers.  And peppers are like anything else we produce, I hate to waste any.

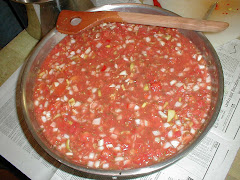
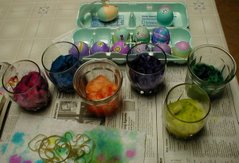
Earlier this summer I had filed away a hot pepper relish-type recipe (attributed to Galen Gann) from the Canning2 list as it sounded like something we would like -- Cowboy Candy.  Hot jalapeno peppers, sliced, and onions, diced, simmered together till just tender in a vinegar brine which is then drained off.  Sugar and spices are added and the result was billed as a "tasty and spicy addition to almost any meal."

 So I used the recipe (posted below) to make 9 pints of Cowboy Candy.  One of the reasons I like the Canning2 list is most posters hate to waste anything, too.  So the original recipe recommended saving the vinegar-water brine to make hot pepper jelly.  But nothing was suggested for the heavy syrup that remained after canning the peppers.

Luckily DH had been asking when we were going to have another batch of Cajun Pickles which made me consider that while they start with a jar of dill pickles, the additional sugar and vinegar called for seemed a possible solution for what to do with the leftover sweet syrup from Cowboy Candy.  So I made a batch of cajun pickles using some of the leftover syrup and an additional two cups of sugar which I estimated would approximate the original sweetness called for in the cajun pickle recipe.  Instead of adding hot sauce, I relied on the heat left in the syrup after simmering the jalapenos plus the jalapeno seeds and almost 1/2 cup of jalapeno and onion bits left after bottling the cowboy candy.  And since the cowboy candy recipe included garlic, mustard seeds and other spices I didn't worry about not using tarragon vinegar or the other seasoning called for in the cajun pickle recipe.

Yes, this makes something slightly different from the original cajun pickle recipe.  Is it very new and different?  No.  It's just a little tweaking, no different than I do on a sometimes daily basis to modify recipes in order to use what's on hand.  Do we like this version?  Yes!  The sweet hot dill flavor is still predominant.  Can't tell too much difference from the original version -- tho the addition of mustard seeds gives it a slightly more "sweet pickle" flavor, if that makes sense.  We like them so much I'm saving the rest of the pickling syrup left from the cowboy candy to make another batch of cajun pickles when these are done.  I love a happy ending.

Candied Jalapenos (Cowboy Candy)
Recipe by: Galen Gann

This makes a very tasty and spicy addition to almost any meal.

First process
4 lb. fresh jalapeno peppers, sliced
2 lb. onions diced
1/2 cup vinegar
1/2 cup water
Second process
6 to 8 cups sugar
2 Tbs. mustard seed
1 tsp. turmeric
2 tsp. celery seed
1 Tbs. garlic powder
1 tsp. ginger

Slice Jalapenos into thin slices and dice onions.  Place in pan with water and vinegar, bring to a boil, cover, reduce heat & simmer about 10 min or until tender. [Note: You could start with canned pickled sliced jalapenos and skip this step.]

Pour off most of the water-vinegar mixture (reserve for making hot pepper jelly, if desired), add the sugar and spices bring to soft candy temperature to completely dissolve sugar (about another 10 min.).  Place boiling mixture into pint jars, leaving 1/2 inch head space. (Reserve extra sugar syrup for making Cajun Pickles, if desired.)  Put on 2-piece lids.  Process 10 minutes in boiling water bath.

If you've never canned before check out the latest Ball Blue Book of Preserving or the USDA-funded website, National Center for Home Food Preserving, for detailed directions.

Thursday, October 28, 2010

Is there such a thing...

 As too much Dr. Who?  Nah...

At least not according to DS who went straight to his pc and created this new background picture after watching the last of (the new) Season 2 shows where the Daleks and the Cybermen battle it out for Earth.


Monday, October 18, 2010

Beautiful lettuce!

No frost in sight and the fall garden's producing gorgeous bug-free lettuce!

Sunday, October 17, 2010

Tea towel embroidery


I always have several projects going at once but when I found this iron-on in an old Workbasket magazine I picked up last month at the thrift store, I knew I had to add one more to the list.

Last night, while DS was busy entertaining a buddy visiting for the weekend and DH was reading the third book in Dewey Lambdin's Allen Lewrie naval series, I whipped out a faux-floursack towel and started to work. 

The iron-on didn't suggest any color scheme but I could already see this big guy as our old roo, Brownie.  Tho, as DS later pointed out, Brownie had more of a rose comb...

I goofed and lifted the transfer paper as well as the iron halfway through the transfer process so the lower half of the design was almost non-existent.  However, I just laid the transfer beside the  towel as I worked and I referred to it whenever I needed help placing the stitches.

The wings gave me the most trouble -- something about having to view those little C-shaped lines and reverse them when stitching due to the mirror-imaging. Messed with my head enough I just "winged" the wings...  and told myself it was only a tea towel, after all. 

Don't know about you, but I always like to look at the back of the work so here's a pic after I finished embroidering.  And, at the bottom of this post, the finished towel.  Ironed and folded, ready for dish duty.  What a great feeling to start and quickly finish a project (good reason to choose small projects!) AND end up with a soul-satisfying hand-tool, too.  Doesn't take much to make me happy...

Monday, October 11, 2010

Theuraputic quilting

This is a fidget quilt.  It's small (this one is 20x16-inches), intended to be held on the lap of an Alzheimer patient.  With a variety of fabric textures, beading, buttons and trims it can help provide a sort of calm for nervous plucking and stroking fingers.  I'd never heard of the idea till it was presented for this year's annual charity project at my fiber guild.  Our meetings are held in space kindly provided by a Charlottesville retirement community which happens to have an Alzheimer unit.  So our fidget quilts didn't have far to travel when we turned in the completed quilts at this month's meeting.

Everyone participating in the charity project came up with a unique block.  One member opted for a completely knitted quilt, using a variety of brightly-colored yarns and knitting patterns to produce a color-block of multi-textured surfaces.  Another member sewed her quilt but included gorgeous fringe trims that made me want to run my fingers through them even when viewed from across the room.  Zippers, pockets, woven and braided trims, beads and ribbons rippled across the completed quilts.  Corduroy, velvet, flannel, felted wools, and damask appeared on some of the blocks.  Other than size, the ability to stand up to commercial laundering was the only other constant for the quilts.

I recycled three fabrics from my stash for the basic block.  One, a white linen with bright blue polka dots, was from a set of kitchen curtains that came in a box at an estate auction.  Another, a blue flower print fabric was a woven cotton remnant from the same auction but out of a different box.  It looked like it had been cut from the bottom of a housedress or apron.  The backing for the quilt was a solid white woven wool-linen blend with a small raised fleur-de-lis design.  I used it wrong-side out as the texture was most prominent on that side.  (It came from the now defunct Stillwater Worsted Mills outlet in Craigsville --I miss that place!)

Laying out the fabric on my cutting board helped me decide on a color arrangement I found pleasing.  I used the suggested size, 20x20-inches, as a guideline keeping in mind I intended to use 3-inch polyester satin blanket binding as the edge finish for the block.   I don't know why I was so drawn to the combination of these fabrics but I'd decided to use them as soon as I heard of the planned project. Call it kismet -- certainly wasn't because I had no other fabrics to choose from...

Next up came the choice of trims.  I found that much harder.  Several things I wanted to use, particularly some lace trims, didn't seem able to hold up to long-term fingering.  I've made a few fabric books for toddlers over the years and sometimes the trims and textures I most want to include are the least likely to withstand small fingers tugging and stroking them.  I figured the same problems would occur with the fidget quilt.

 So I went with easily secured items like buttons and appliques with only three narrow polyester ribbons holding a bead each dangling from the surface.  When it came to the last section, I knew I wanted to use a piece cut from a striped wool sweater I'd felted.  I chose to cut a mitten shaped to my hand and only wish I could have attached a full mitten capable of having a hand slipped inside as DH suggested. But I'd already sewn it to the fabric when he offered the suggestion.  Since the project was due the next day, I didn't feel up to a rush job of removing and then figuring out the mechanics of the switch and re-applying.

I always have some sort of handwork project close by because otherwise I fidget when watching a video, waiting for appointments or to pick up DS at his activities.  In this case, the fidget quilt while in my hands served to quiet someone before it ever made it to it's intended recipient.  I hope whoever uses it enjoys it as much as I did.