Saturday, December 11, 2010

More ornaments


I'm still playing with felted hearts and this is the one I made yesterday for today's guild meeting and its annual ornament exchange.   Process was the same as the one I worked on earlier this week but I went with an additional appliqued heart in a darker green.  I think it brings out the other green a little more and it fulfills the quote -- "(his) small heart grew 3 sizes that day."

These paper and fabric ornaments came to me through the Chickens in the Road ornament exchange from Kelly F.  Who wouldn't love to open a package and find handmade Christmas ornaments?

Thursday, December 9, 2010

(his) small heart grew three sizes that day

 
When I wanted to make felted Christmas ornaments this year, hearts were what I thought of.  And as soon as I started folding paper to cut out a heart pattern, I remembered the line from one of my favorite Christmas videos -- "Well, in Whoville they say that the Grinch's small heart grew three sizes that day."  From there it was easy to see what I was going to make.


For the fabrics, I chose a heathery red wool sweater and a poison green wool blazer I'd fulled in the wringer washer.  I wanted to layer another heart in order to fulfill the quote's prophecy but couldn't come up with a third color from my stash that worked and refused to change the first two.  (Sometimes my muse is very stubborn.)  So the photo above shows my first attempt.  Unfortunately no matter how I changed the lighting I couldn't capture the true nature of the green.


Compared to choosing the fabrics, the process of making the ornament was easy.  I pressed a medium-weight iron-on interfacing to the wrong-side of the two wools before cutting out two large red and one small green heart shapes.  Then, because the white stabilizer showed along the edges, I tore off a thin piece along the borders of each before attaching them.  The blanket stitching affixing the green heart to one of the red hearts as well as the other embroidery and beading were finished before I blanket-stitched the two red hearts together.  For a hanger, I whip-stitched a loop of ribbon between the two layers of red wool.  Eh, voilĂ , the first heart was done.  More to follow.

Wednesday, December 1, 2010

My last chulo?

Well, maybe not, but I have to say I'm glad to have this one is finished. 

DS watched me knit a chulo for his cousin last Christmas from the book Andean Folk Knits: Great Designs from Peru, Chile, Argentina, Ecuador & Bolivia by Marcia Lewandowski.  I went straight by the pattern and finished the hat in two days.  Then DH insisted he needed a chulo, too.  DS watched that process patiently as well.  So what could I say when he asked for a chulo of his own?

We determined that just as his dad had wanted a change of pattern (Celtic knot from Alice Starmore's Charts for Colour Knitting a Designer's Source Book From the Personal Collection of Alice Starmore), DS also wanted something different.  We tried combinations of his initials and llamas and even made an attempt to reduce his cat, April, to a caricature -- apparently impossible to do with some cats!  Finally he settled on a modified dog chart taken from Lewandowski's book that reminded him of Holly-dog.  I wanted to use the  Cascade 220 yarn I had on hand so Holly-dog's biscuit color translated as yellow and DS wanted to deviate from his more usual red or blue color schemes with a khaki green.  For the accent color, I used the same light brown I'd used in the other two chulos. 

This one took more than two days.  More like two months, off-and-on.  Had to frog the charted design TWICE as I added an extra row of yellow one time and managed to insert a brown spot on a solid-colored dog another.  (That's what comes of me trying to knit and watch a movie.)   I also wish I'd paid more attention to the way I carried the yarn across the back of the dog's body because by making consistently even pick-ups I created lines I'd rather have avoided -- perhaps by using an alternating carry.

Also, truth be told, I was bored with the whole chulo.  Changing out the pattern helped but, except for those diagonally-knitted dishcloths, basic socks or what I call my Girl Scout houseshoes, I NEVER knit the same thing twice, much less three times.  What kept me going was an 11yo who showed so much pleasure at the idea of having a chulo of his own that I couldn't have quit if I'd needed to.  The night I finished it, DS wore it around all evening then stashed it away before bed so he could surprise his dad with it when he got home the next day. 

Friday, October 29, 2010

Cajun Cowboy Candy Pickles

Is that a mouthful to say or what?  But they taste good and are a sort of by-product of another session of canning.

A few months ago I posted about a tasty hot and dill pickle recipe a friend had shared called Cajun Pickles.   Then, last weekend in anticipation of our first frost, DH pulled up all the pepper plants in the garden.  So I've been busy putting up serrano, jalapeno, thai dragon and Fooled You peppers.  Some went into a ristra, some were spread on trays for drying, some were canned for later use in salsa or crockpot Italian beef, some went into more hot sauce and some went to another friend because I'd run out of ideas.

But I still had about 8 pounds of jalapeno peppers.  And peppers are like anything else we produce, I hate to waste any.

Earlier this summer I had filed away a hot pepper relish-type recipe (attributed to Galen Gann) from the Canning2 list as it sounded like something we would like -- Cowboy Candy.  Hot jalapeno peppers, sliced, and onions, diced, simmered together till just tender in a vinegar brine which is then drained off.  Sugar and spices are added and the result was billed as a "tasty and spicy addition to almost any meal."

 So I used the recipe (posted below) to make 9 pints of Cowboy Candy.  One of the reasons I like the Canning2 list is most posters hate to waste anything, too.  So the original recipe recommended saving the vinegar-water brine to make hot pepper jelly.  But nothing was suggested for the heavy syrup that remained after canning the peppers.

Luckily DH had been asking when we were going to have another batch of Cajun Pickles which made me consider that while they start with a jar of dill pickles, the additional sugar and vinegar called for seemed a possible solution for what to do with the leftover sweet syrup from Cowboy Candy.  So I made a batch of cajun pickles using some of the leftover syrup and an additional two cups of sugar which I estimated would approximate the original sweetness called for in the cajun pickle recipe.  Instead of adding hot sauce, I relied on the heat left in the syrup after simmering the jalapenos plus the jalapeno seeds and almost 1/2 cup of jalapeno and onion bits left after bottling the cowboy candy.  And since the cowboy candy recipe included garlic, mustard seeds and other spices I didn't worry about not using tarragon vinegar or the other seasoning called for in the cajun pickle recipe.

Yes, this makes something slightly different from the original cajun pickle recipe.  Is it very new and different?  No.  It's just a little tweaking, no different than I do on a sometimes daily basis to modify recipes in order to use what's on hand.  Do we like this version?  Yes!  The sweet hot dill flavor is still predominant.  Can't tell too much difference from the original version -- tho the addition of mustard seeds gives it a slightly more "sweet pickle" flavor, if that makes sense.  We like them so much I'm saving the rest of the pickling syrup left from the cowboy candy to make another batch of cajun pickles when these are done.  I love a happy ending.

Candied Jalapenos (Cowboy Candy)
Recipe by: Galen Gann

This makes a very tasty and spicy addition to almost any meal.

First process
4 lb. fresh jalapeno peppers, sliced
2 lb. onions diced
1/2 cup vinegar
1/2 cup water
Second process
6 to 8 cups sugar
2 Tbs. mustard seed
1 tsp. turmeric
2 tsp. celery seed
1 Tbs. garlic powder
1 tsp. ginger

Slice Jalapenos into thin slices and dice onions.  Place in pan with water and vinegar, bring to a boil, cover, reduce heat & simmer about 10 min or until tender. [Note: You could start with canned pickled sliced jalapenos and skip this step.]

Pour off most of the water-vinegar mixture (reserve for making hot pepper jelly, if desired), add the sugar and spices bring to soft candy temperature to completely dissolve sugar (about another 10 min.).  Place boiling mixture into pint jars, leaving 1/2 inch head space. (Reserve extra sugar syrup for making Cajun Pickles, if desired.)  Put on 2-piece lids.  Process 10 minutes in boiling water bath.

If you've never canned before check out the latest Ball Blue Book of Preserving or the USDA-funded website, National Center for Home Food Preserving, for detailed directions.

Thursday, October 28, 2010

Is there such a thing...

 As too much Dr. Who?  Nah...

At least not according to DS who went straight to his pc and created this new background picture after watching the last of (the new) Season 2 shows where the Daleks and the Cybermen battle it out for Earth.


Monday, October 18, 2010

Beautiful lettuce!

No frost in sight and the fall garden's producing gorgeous bug-free lettuce!

Sunday, October 17, 2010

Tea towel embroidery


I always have several projects going at once but when I found this iron-on in an old Workbasket magazine I picked up last month at the thrift store, I knew I had to add one more to the list.

Last night, while DS was busy entertaining a buddy visiting for the weekend and DH was reading the third book in Dewey Lambdin's Allen Lewrie naval series, I whipped out a faux-floursack towel and started to work. 

The iron-on didn't suggest any color scheme but I could already see this big guy as our old roo, Brownie.  Tho, as DS later pointed out, Brownie had more of a rose comb...

I goofed and lifted the transfer paper as well as the iron halfway through the transfer process so the lower half of the design was almost non-existent.  However, I just laid the transfer beside the  towel as I worked and I referred to it whenever I needed help placing the stitches.

The wings gave me the most trouble -- something about having to view those little C-shaped lines and reverse them when stitching due to the mirror-imaging. Messed with my head enough I just "winged" the wings...  and told myself it was only a tea towel, after all. 

Don't know about you, but I always like to look at the back of the work so here's a pic after I finished embroidering.  And, at the bottom of this post, the finished towel.  Ironed and folded, ready for dish duty.  What a great feeling to start and quickly finish a project (good reason to choose small projects!) AND end up with a soul-satisfying hand-tool, too.  Doesn't take much to make me happy...

Monday, October 11, 2010

Theuraputic quilting

This is a fidget quilt.  It's small (this one is 20x16-inches), intended to be held on the lap of an Alzheimer patient.  With a variety of fabric textures, beading, buttons and trims it can help provide a sort of calm for nervous plucking and stroking fingers.  I'd never heard of the idea till it was presented for this year's annual charity project at my fiber guild.  Our meetings are held in space kindly provided by a Charlottesville retirement community which happens to have an Alzheimer unit.  So our fidget quilts didn't have far to travel when we turned in the completed quilts at this month's meeting.

Everyone participating in the charity project came up with a unique block.  One member opted for a completely knitted quilt, using a variety of brightly-colored yarns and knitting patterns to produce a color-block of multi-textured surfaces.  Another member sewed her quilt but included gorgeous fringe trims that made me want to run my fingers through them even when viewed from across the room.  Zippers, pockets, woven and braided trims, beads and ribbons rippled across the completed quilts.  Corduroy, velvet, flannel, felted wools, and damask appeared on some of the blocks.  Other than size, the ability to stand up to commercial laundering was the only other constant for the quilts.

I recycled three fabrics from my stash for the basic block.  One, a white linen with bright blue polka dots, was from a set of kitchen curtains that came in a box at an estate auction.  Another, a blue flower print fabric was a woven cotton remnant from the same auction but out of a different box.  It looked like it had been cut from the bottom of a housedress or apron.  The backing for the quilt was a solid white woven wool-linen blend with a small raised fleur-de-lis design.  I used it wrong-side out as the texture was most prominent on that side.  (It came from the now defunct Stillwater Worsted Mills outlet in Craigsville --I miss that place!)

Laying out the fabric on my cutting board helped me decide on a color arrangement I found pleasing.  I used the suggested size, 20x20-inches, as a guideline keeping in mind I intended to use 3-inch polyester satin blanket binding as the edge finish for the block.   I don't know why I was so drawn to the combination of these fabrics but I'd decided to use them as soon as I heard of the planned project. Call it kismet -- certainly wasn't because I had no other fabrics to choose from...

Next up came the choice of trims.  I found that much harder.  Several things I wanted to use, particularly some lace trims, didn't seem able to hold up to long-term fingering.  I've made a few fabric books for toddlers over the years and sometimes the trims and textures I most want to include are the least likely to withstand small fingers tugging and stroking them.  I figured the same problems would occur with the fidget quilt.

 So I went with easily secured items like buttons and appliques with only three narrow polyester ribbons holding a bead each dangling from the surface.  When it came to the last section, I knew I wanted to use a piece cut from a striped wool sweater I'd felted.  I chose to cut a mitten shaped to my hand and only wish I could have attached a full mitten capable of having a hand slipped inside as DH suggested. But I'd already sewn it to the fabric when he offered the suggestion.  Since the project was due the next day, I didn't feel up to a rush job of removing and then figuring out the mechanics of the switch and re-applying.

I always have some sort of handwork project close by because otherwise I fidget when watching a video, waiting for appointments or to pick up DS at his activities.  In this case, the fidget quilt while in my hands served to quiet someone before it ever made it to it's intended recipient.  I hope whoever uses it enjoys it as much as I did.

Sunday, September 5, 2010

This year's hot pepper sauce

Is a blend of Thai dragon and serrano peppers. 

Why?  Because those are the main hot peppers, along with cayenne, which DH planted.  And, when it came time to make a batch of hot pepper sauce, those were the two that were ready to harvest.  The cayenne peppers aren't ripening as fast for some reason.

I make hot pepper sauce that's vinegar-based so it can set on the pantry shelf after opening.  Because I make enough to last a year, I process pints or quarts for 10 minutes in a boiling water bath canner.  Then when it's ready to use or we need to open another batch, I can decant into a recycled glass bottle more appropriate for dispensing dashes of hot sauce.

Like pickles, this hot pepper sauce benefits from some time just sitting in the jar before using.  The flavors will meld and the vinegar will lose some of its overpowering strength.  Which improves the overall flavor and lets the peppers shine.  I do add a bit of salt and, if I remember, I add a few cloves of garlic -- we were so busy processing tomatoes for juice and ketchup, canning another 18 quarts of chicken broth from chicken backs and necks stockpiled in the freezer, and putting up the pimiento peppers from my brother-in-law's garden that I didn't think of pulling garlic to add this time till I was pureeing the sauce.  Thus this batch is garlic-free.

This recipe doesn't require precise measurements but I've learned that it's a good idea to weigh the peppers and measure the amount of vinegar I use so I can come close to duplicating a batch if it turns out to be a very good year.  Even with precise amounts, tho, the batches may not be the same year-to-year as the peppers themselves can vary depending on growing conditions.  Some years just yield better flavor than others.  Lucky for us, drier years seem to be particularly good.

For this year's Thai Dragon-Serrano Pepper Sauce, I used 12 ounces Thai dragon peppers and 26 ounces serrano peppers.  Weighed before cutting off the short stems and little caps.  I put the peppers in a large dutch oven and added 8 cups distilled white vinegar and 1 tablespoon salt to the pan.  I loosely covered the pan and simmered the peppers in the vinegar-salt mixture for about 30 minutes, until they were softened for pureeing.

The peppers and liquid went into the blender in two batches as it was too much to process in one.  I put a lid over the opening in the blender lid to try to hold back the splashing.  Plus, I put the blender outside on the back deck instead of doing this in the kitchen.  The wafting pepper steam will burn eyes and sinuses so fresh moving air is a good idea.  Don't do the blending in a small enclosed space!

Even tho using the blender, it's a good idea to strain the mixture through a wire mesh.  I processed it in our well-loved and tough-working vitamix and still had over a cup of seeds and pepper bits left to strain out.  (The remaining pulp can make a good pest deterrent in the garden but ours went into the compost this time.)

I was left with 2 quarts and almost 1 pint of hot pepper sauce.  It was too thick to sprinkle easily from a bottle so I thinned it slightly by adding almost 2 more cups of white vinegar.  The hot pepper sauce went into canning jars which I processed for 10 minutes in a BWB.  Yield of 6 pints.

If you've never canned before check out the latest Ball Blue Book of Preserving or the USDA-funded website, National Center for Home Food Preserving, for detailed directions.

Tuesday, August 10, 2010

Nothing like a private fireworks show...

County fair started tonight, with, as usual, a fireworks show at the end of the evening. The fairgrounds are a couple miles away by road but only a mile as the crow flies. The fireworks are set off on a hill behind our house. Perfect viewing location!

Monday, August 9, 2010

They grow up so fast

Chickens, that is.  (Kids, too, but that's another post.)

Smokey, the grey Silkie chick, (cockerel, we think) is now 10 weeks old.  His mama hen, Bandit, a first-timer on the hatching circuit, is like many mothers -- she wants her freedom but she can't quite drop the chick. She's a flyer, always going walk-about in the front yard, visiting the compost pile, that kind of thing.  And motherhood didn't change her.

She flew the chick pen the day after Smokey hatched.  Fortunately it was warm weather so he wasn't left alone AND cold but we had to put a wire cover on their pen, forcing Bandit to stay in.  And that was difficult for Bandit.  She paced the fence of her small enclosure, squawking almost constantly about her internment.  Poor Smokey spent most of his early days running alongside her trying to keep up so when she did settle down he could scoot underneath for a bit of warm "mama hen time."

DH listened to me debate with myself over whether to leave Smokey in with his seemingly dysfunctional mama hen or foster him in the garage.  (He didn't debate because he was not in favor of a chicken in the house.  Thin end of the wedge, you know.) I debated because as often happens with our livestock, I'm torn between the food-production side of life and the pet side plus nature vs. nurture -- difficult philosophical subjects here, people!

After the first couple of  weeks, we tried letting them both out into the backyard with the other backyard girls (and Snowball's one-week-older chicks) but Smokey couldn't keep up with Bandit's long legs and certainly not with her wings when she would go up and over the fence for a quick compost reccon.  So they went back in the closed pen till about 10 days ago.

Then, at almost 9 weeks, it seemed time to let him out with the flock to take his chances in our relatively safe backyard while still, somewhat, under Bandit's tutelage.  The neat thing we discovered was while Bandit may head off on her own as usual, Smokey's better able to keep up and, best of all, Bandit is now keeping a protective, if laid-back, eye on her older chick.  Now if Smokey cries out -- like when DS picked him up for this photo -- Bandit comes charging to his rescue.  Forget the times when she left a newly-hatched chick on his own in the chick pen, she's remembered that she has a responsibility.  It's cool to watch their interaction and that of Badger, the grey Silkie roo, who steps in to herd his ladies and any of their chicks as he thinks necessary.
Badger is definitely Smokey's sire and while Mrs. Badger, the other half of our grey Silkie pair, laid the egg, Bandit is his mama hen.  Together they make a great chicken family with some human parallels that make for interesting chicken-watching conversations on a slow summer afternoon.
Badger protectively watching over Bandit and a mostly-hidden Smokey -- even Happy Lamb turns from the camera...

Badger and his "other" families including Snowball and her then-11-week-old chicks: the Turken Twins, Dion the Wanderer and, in front, TBD or the-chick-to-be-named-later.

(Sort of makes me feel I'm reporting for a celebrity rag chicken-expose on polygamous roos but then I'm back to anthropomorphizing...)

Saturday, August 7, 2010

Something old and something new

Well, maybe familiar would be a better choice than old...

After canning 16 pints of a spicy plum dipping sauce I've made for years, we tried something different with a few pounds of the damsons picked earlier in the week.  I've read of fruit cheeses in novels and English cookbooks and finally the time seemed right to try making some myself.

Fruit cheese is made from fruit and sugar and will hold its shape; it can be made in a straight-sided crock or jar and turned out for slicing when ready to serve rather than being spooned out like a softer preserve.  Tart fruits such as damsons and gooseberries seem most common but there may be other fruits that would work as well.  And fruit cheese will keep for months, too, thanks to all the sugar.

It's a pretty basic recipe.  For each pound of damson pulp left after sieving to remove the pits and break up the skins, you use 2 cups of sugar.  Here's a link to a page on the neat site, The Cottage Smallholder, with the easy directions.

The spicy plum dipping sauce is my adaptation of Helen Witty's "Chinese-style Plum Sauce" recipe included in her wonderful Better Than Store-Bought: A Cookbook. I modified it to include crushed pineapple and exclude the corn syrup and whole mustard seeds.  I previously posted the original version on Farm Bell Recipes at Chickens in the Road in case you want to compare the two.  Either one is great for dipping egg rolls, chicken strips, etc. 

The original recipe makes about 4 pints and the version below makes about 15 pints though it could be halved without a problem.  I found we liked this so well it's better to make enough to last till the next year's fruit harvest and still have a little to give away.  I hate it when friends or family beg, don't you?

Remember that this is a sauce for canning.  It's meant to be made and then held on the shelf for a minimum of a couple of weeks before serving -- better yet, make it this summer than wait till Thanksgiving to enjoy.  Almost any recipe for a preserve like this, or for pickles or relish -- similar dishes, really -- will benefit from a waiting period to allow the flavors to meld.  If you taste this as you're preparing it (and I always do and think you should, too) it will likely taste too vinegary and the flavor of the peppers may be too strong, too.  That's normal.  Give it a few weeks, preferably a couple of months if you can wait that long, and the flavors will meld into a wonderful dipping sauce you'll certainly prefer over that orangey-pink stuff in the little plastic packets.

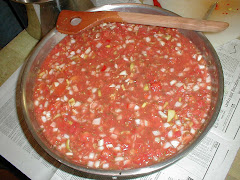
Spicy Plum Dipping Sauce

8 cups plum pulp, *See note
8 cups peach or nectarine pulp, *See note
2 (20 ounce) cans crushed pineapple in juice
2 large onions, diced
2 sweet bell peppers, seeded and diced
5 jalapeno peppers, seeded and membrane removed, finely diced
3-inch knob of gingerroot, peeled and finely diced or shredded
1 head garlic, peeled and minced
6-1/2 cups apple cider vinegar, 5% acidity
3 cups water
1/4 cup dry mustard
3 tablespoons kosher salt
2 cups granulated sugar
2 pounds brown sugar (approximately 4-1/3 cups)

Combine the fruit pulp, pineapple, onions, peppers, gingerroot, garlic, and vinegar in a very large non-reactive kettle.  Bring to a simmer over low heat.  In a bowl, combine remaining ingredients and whisk to blend.  Add to the fruit mixture and allow to simmer for an additional 45 minutes.

If you prefer a smoother sauce, press mixture through a chinoise or food mill. Return to the kettle and boil gently, stirring, until the sauce has thickened, about 15 minutes longer (it will thicken a little more while cooling).

Process in BWB in half-pint (10 minutes) or pint (15 minutes) jars, leaving 1/2″ headspace.

Allow the flavors to meld in the jars for at least 2 weeks, better a month, before serving. This one definitely improves with a month or two of waiting — it’s worth it.

Notes:
I use a steam juicer to prepare the damsons and nectarines or peaches.  It lets me obtain juice from the fruit than run the remaining pulp through a chinoise or food mill to yield stoned, sieved fruit ready to turn into a smooth sauce. (The juice I either can or use for another purpose.)

Alternatively, coarsely chop fruit and place in a large pot.  Heat fruit till softened sufficiently to run through a food mill, removing pits and skins, then measure out the amount of pureed fruit called for in recipe. Repeat for other type of fruit indicated in recipe.

Optional but good:
Roast the sweet red peppers over a flame or under the broiler till the skin is burned almost black. Let stand 5 minutes, then wrap in a plastic bag and let stand for 15 minutes. Quarter lengthwise, scrape off the skin and remove the seeds then set the peppers aside till called for in recipe.

Thursday, August 5, 2010

Damsons!

We picked about 4 gallons of damsons yesterday. I put together one jar each gin- and vodka-infused damsons with sugar. Both will take several months to work their magic and then damson liqueur for everyone! 

For each 1/2-gallon jar I used 2 lbs of damsons, each pricked several times with a fork, plus 12 ounces of granulated sugar and enough vodka or gin to cover the fruit -- about .65L each. Put a lid on the jars and covered them with brown paper to keep out the light. I'll shake them once every day or so till the sugar's dissolved. Then they'll sit on an out-of-the-way shelf in the kitchen for at least three months when we'll taste and decide if it's time to strain and bottle or wait another couple of months.

The other damsons are on their way to becoming damson cheese, spicy plum sauce, damson preserves and juice for syrup or drinking.  More recipes to come...

Wednesday, August 4, 2010

Hot and dry but still producing

Today's harvest.
Hillbilly tomatoes with Arkansas Traveler and a few Early Girls
Green bell peppers with hot jalapenos and some Fooled You imitators.
Hillbilly and Arkansas Traveler tomatoes
Green bell peppers and Kennebec potatoes

Tuesday, July 6, 2010

99 in the shade

Yes, it's hot.  But even as the indoor/outdoor thermometer was showing 99Âş in the shady backyard (I refused to look at the thermometer out front in full sun), the inside temperature never topped 80Âş today.  Not bad considering we don't run A/C.

When we bought this house, it needed a new roof and I don't just mean the shingles needed replacing.  When we chose the trusses we went with a 36" overhang for the eaves to help shade the windows on hot summer days.  I also put those 1" metal mini-blinds at every window -- they are an off-white like the walls and woodwork so can either blend in or unobtrusively hide behind other window treatments as desired.  Plus DH installed a whole house fan in the central hall's ceiling to help bring in the late evening's cooler outside air.  And last year, DH finally got to mark another item off his to-do list when he installed (with some help from my uncle) new windows all-around.  Unfortunately, we're still waiting for a time when we can upgrade the insulation...

But for now, we open the windows when the outside air cools down and turn on the whole house fan in order to pull the cooler air inside.  Then, during the heat of the day, we keep windows and doors closed and draw the blinds so the house maintains that coolness.  Every room has a ceiling fan that we can switch on as needed, too.

So it gets hot -- sometimes the steel front door is hot to the touch on the INSIDE, but unless the humidity goes above 60% or so it doesn't feel any worse than it might if we ran the central air.  I think it's even better because in previous years (this is the second summer for our "no a/c" policy) when we'd break down and turn on the air, many nights it would be cooler outside than in since we set the thermostat high (78Âş or 80Âş) to conserve energy and money. 

This is the second house we've put a whole house fan in. I grew up with one my dad had purchased thru the Sears catalog so I knew how effective they can be. DH was willing to give it a try at the other house and then, when we moved here, it was one of the first things he worked on. And considering how much work this house needed, that says a lot. If you're looking at ways to reduce the cost of cooling your house, consider a whole house fan. They're relatively inexpensive to buy, easy to install and cheap to run when compared with the A/C. Drawbacks? Can be noisy, check out the sound levels as it varies between models (direct drive vs. belt driven).

Monday, July 5, 2010

Too hot, too dry -- negative waves abound


This was today's harvest.  A few cucumbers, squash, bell peppers and a variety of tomatoes -- plus one shallot I pulled to check their progress.  Not too bad, huh?  Well, take a good look because it may be the best of the season.

Our garden is wilting from the heat and lack of rain.  After more than four weeks without any rain, DH used the last of the collected rainwater over a week ago.

Much of May and June was hot -- days over 90ÂşF. and nighttime lows tended to stay above 70Âş.  After a slight reprieve last week, the National Weather Service issued an Excessive Heat Watch for the next few days.  That means it's likely to hit triple digits.  And, other than a very slight chance of thunderstorms at the end of the week, there's no rain in sight.

The melons and winter squash in the photo above are mulched with straw.  Can you tell the difference between the straw mulch and the regular grass "growing" in the upper right of the picture?  The late-planted tomatoes are coming into bloom but I have serious doubts they will produce much edible fruit.  Blossom-end rot is a killer when the water supply's erratic.  The second planting of beans is looking good but I expect it will start to show the effects of no rain before many days pass.  Yes, I know, "always with the negative waves, Moriarity, always with the negative waves."  I'll try to do better tomorrow.

Saturday, June 26, 2010

You don't always have to start from the beginning.

I make most of our pickles from cucumbers or other vegetables that DH raises in the garden. Usually from seeds he started, often from seeds we've saved. But not always.

A friend served these pickles at a Garden Club luncheon a few months ago and everyone present asked for the recipe. They're that good. And they start with a jar of dill pickles.


Pat's Cajun Pickles

1 gallon whole dill pickles
7-1/2 cups sugar
1 cup tarragon vinegar
1 to 2 ounces Tabasco sauce (I use the full amount but we like the heat)
2 cloves garlic, minced
1 large onion, sliced

Drain and discard the pickle juice.  Slice pickles. Mix vinegar, Tabasco sauce, and garlic together.

Layer pickle slices, onion slices, sugar and vinegar mix in emptied pickle jar. Put on the lid and seal with plastic wrap because the lid invariably leaks during rolling.

Lay jar on its side on counter (you may want to put a folded kitchen towel under the jar to stop it from accidental rolling). Roll the jar to mix ingredients. I tilted and sort of shook mine to get the blending started but that's not required. The sugar will eventually dissolve if you remember to roll the jar several times each day. Let set on counter for 7 days before eating. You can refrigerate after the time's up if you want.