Sunday, March 30, 2008

The finished egg...


I forgot to post a picture of my finished Ukrainian Easter egg. Someone kindly pointed that out to me a few days ago. (Hi, Jocelyn!)

So here's my egg in all its glory. And, no, I won't be going into production on these any time soon...

Making applesauce

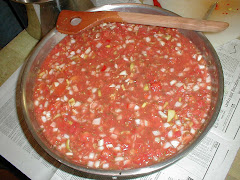
Had a few apples (Romes, Fuji, and who knows what) that wouldn't keep much longer so cut them up this morning and made a batch of applesauce. Some will go into the freezer for later but we'll eat a good bit of it this week.

It's easy to do. Wash the apples and slice into quarters or smaller. Remove core in the process. If you don't want to be bothered pushing them thru a sieve or ricer later, peel the apples, too. For my part, I like to get all the nutrients and hate to peel more than I mind using the ricer. YMMV

Using a large pan, add 1/2" of water and then the apples. Place over low-to-medium heat. I use a simmer pad on my gas stove burner as it helps keep the apples in the bottom from sticking before the ones on top are soft. Cook, stirring occasionally, about 30 minutes or until apples are soft and begin turning to sauce when you stir. You can can applesauce but unless I'm making a lot (like when our apple tree exploded one year and I canned 150 pints) I pour the sieved applesauce into recycled freezer bowls such as cottage cheese or yogurt containers. Leave a 1/2-inch headspace, put the lid on tightly and freeze till you want some fresh-tasting applesauce. Yum!

No need to add sugar. If the apples were sweet-tasting when eaten out of hand, they'll make sweet applesauce. You can always sprinkle on a little cinnamon-sugar when serving if you must.

The chickens were happy to take care of the apple cores and what remained after ricing. DS and I took a bowl of applesauce out to my mom's for dinner tonight, too. Everyone's happy with fresh applesauce and I'm happy not to waste those apples!

Monday, March 24, 2008

Resist dyeing eggs?

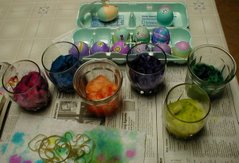
We can't. First we boiled two dozen brown eggs and DS spread newspaper on the worktable in the kitchen. DH scrounged up wide-mouth jars to hold the dye. This year I bought a dye kit at the dollar store. The dyes come in pellet form and all but the red and purple ones required vinegar be added to the water when mixing.

The egg colors were pretty but a bit muted due to using brown eggs, I think. The yellow egg in the middle front was gorgeous! Not a blemish on it. The others had light spots and smudges where the dye seemed to come off on our hands or the tongs we used to lift the eggs from the dye baths. That should have been my clue on the quality of the dye but I couldn't help stuffing picked Border Leicester wool (from Vanna or Lacy, I never could tell them apart) in the dye jars after DS finished dyeing eggs. I'm still trying to rinse the dyed wool. The colors bleed terribly. Guess this wool will be destined for a project that must need never be washed...

This year we followed our usual Easter egg dyeing routine with a session making Ukrainian Easter eggs or pysanky. (See Next Up: Pysanky)

Pysanky is a wax-resist method of dyeing done in stages depending on how many colors you want to use. We started by using a pencil to lightly mark our eggs with the beginnings of a design. The photo shows DS's egg with a ship design. He went for the non-traditional design.

Then we used a kistka to apply melted wax to the parts we wanted to remain the original egg color. (We all chose green eggs tho it's hard to tell that from some of these photos.) DH is holding his egg, mine sets to the left and DS's egg, without any wax, is at the top. The next step was to dip the egg in the first color. Color order is chosen by its coverage ability. I stirred up yellow, orange, red, royal blue, and black and set them up on a separate workspace in that order.

When I finished my first coat of wax, I lowered my egg into the yellow dye bath and left it for about 10 minutes as I wanted a fairly deep yellow color. It took longer to apply the next bit of wax as I wanted more of the egg to remain yellow than I wanted the original color to show. Then I lowered the egg into the red dye. It was another 10 minutes before I could remove my egg. These pictures show both sides of the egg.

DS, meanwhile, started working on his egg with the electric kistka -- he doesn't like using the candle flame to heat the kistka, and DH used the red- and white-handled kistky, noting the difference in the funnel opening on each. He also marveled that one little block of beeswax has lasted thru so many eggs over the years. Now that he and DS have decided this is a craft they can do, I may have to buy more.
Since I only wanted two dye colors, yellow and red, for my egg, I finished ahead of DH and DS who still have work to do on theirs. I needed to get started on dinner and DH obligingly offered to remove the wax from my egg.It's easy to do. Just hold the egg close to the candle's flame and let the wax heat till you can wipe it off with a paper towel but be careful working around the flame.

Thursday, March 20, 2008

Next up: Pysanky

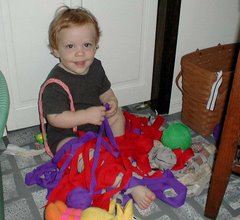
This week I broke out the kistky, beeswax and dye packets. DH and DS are ready to try making Ukrainian Easter eggs.

They've been studying a few books I have on the subject for ideas: Decorating Eggs: Exquisite Designs with Wax & Dye, Eggs Beautiful: How to Make Ukrainian Easter Eggs, and Ukrainian Easter Eggs and How We Make Them. We even took one with us to a homeschool group field trip yesterday -- came in handy as we waited for everyone to arrive. Interesting reading on the themes and meanings behind the traditional designs and lots of line drawings for use in our own eggs.

I first practiced the craft about 20 years ago when a member of my Garden Club hosted a workshop. (And you thought Garden Clubs went out with ladies in hats and gloves...) We used the traditional and brass funneled versions that time and stored the dye in wide-mouth glass jars between sessions. The eggs were store-bought and we didn't blow out the egg. We left them to dry on their own. One of mine "blew up" after several months and I never was able to determine a specific reason. Luck of the draw, I guess.

My kistky came from the Ukrainian Gift Shop in Minneapolis, MN. I have three interchangeable heads (fine, medium and heavy) for my electric kistka and the red-handled kistka is rated "heavy" and the white-handled kistka is "fine." This refers to the size of the wax line each makes, determined by the diameter of the funnel tip. I don't find much difference between the electric and non-electric versions. Both require beeswax. (I use wax with black dye -- shows up better on the egg, I think.) But with the electric kistka, it heats on its own, no need for a candle flame.

Though I usually prefer the traditional tools for a craft, I don't like using a traditional kistky. Those are made by rolling a quarter- or half-circle piece of thin copper into a funnel shape, inserting the funnel thru a hole drilled in the handle and wrapping wire in a figure-8 around the funnel to hold it in place. Now, this is based on only two times of using a traditional kistka (Garden Club and local library workshops) so perhaps with use I'd come around but, for me, I found the funnels leaked along the seams and the wax didn't flow thru as smoothly as with the brass funneled kistka or the electric kistka.

Well, I hope to have photos of the process and end result after we try this as a family craft. Wish us luck!

Wednesday, March 19, 2008

Chicken that tastes baked prepared in the slow cooker


I'm not a big fan of lots of slow cooker meat and poultry recipes as I often find the meat too stewed for my taste (similar to store-bought canned meat or poultry). I cooked this for almost 5 hours on High as the recipe instructs and the chicken came out like I'd baked it in the oven. The skin wasn't really crisp but the meat was juicy and still firm tho it pulled from the bone with ease.

Spicy Turmeric Chicken
From "Not Your Mother's Slow Cooker Recipes for Entertaining" by Beth Hensperger and Julie Kaufmann

The book attributes this recipe to Laura Quemada as adapted from Madhur Jaffrey's "Indian Cooking." Whatever the original source, it's a keeper. My variation on the recipe was to apply the marinade to chicken leg quarters and layer them in the crock instead of using a whole bird as directed.

We ate this for dinner hot with a rice pilaf and green beans, for lunch the next day at room temperature as part of a chef's salad, and nibbled on pieces out of the fridge in between. Didn't have any left to try it, as the book suggests, wrapped in a tortilla tho that sounds good, too.

Turmeric Marinade:
1 tbs ground cumin
1 tbs paprika
1 tbs ground turmeric
1-1/2 tsp red chile powder or 1 tsp cayenne pepper
1-1/2 tsp fresh ground black pepper
2-1/2 tsp salt
2 to 3 cloves garlic, to your taste, mashed to a paste
6 tbs lemon juice

One 4-pound broiler/fryer chicken or 4-pounds of chicken leg quarters

Rub inside of crock with oil.

Stir marinade ingredients together in small bowl. May use small food processor if desired.


Note: turmeric will stain surfaces yellow so use glass or stainless steel containers or utensils. May stain a light-colored slow cooker crock also. Use a disposable plastic glove to apply marinade to chicken as it will stain skin, too. (I used a plastic food bag to cover my hand while applying marinade.)

Using your hand, apply marinade generously to all sides of chicken. Place chicken in crock and cover. Note that no liquid is used with the chicken. Cook on High for 4 to 5 hours, or on Low for 7 to 9 hours, until meat pulls easily away from the bones. Enjoy!

My notes: When I prepare this again, I'm going to use my homemade garlic powder instead of the garlic cloves and I'm not going to add the lemon juice to the whole mix. I plan to divide it into two bowls and add about half the juice to one bowl. I'll apply that to the chicken and, if it's like this time, I won't need the other portion. So I will put the blend in a labeled spice jar adding the remaining amount of lemon juice when ready to prepare Spicy Turmeric Chicken again. Which won't be long if the reaction to the dish this time is anything to go by.

Tuesday, March 11, 2008

A Savoury Crust for a Tomato-Onion Tart

I think I'm having way too much fun with KitchenParade.com's Pi Day Challenge. Today was a busy day what with running DMom to one doctor and three therapy appointments, the post office and the library. Not to mention having a recalitrant 8yo unexpectedly in tow due to a foul-up between my and DH's schedules. Yet all day, in the back of mind, I was considering the variety of pies I make and the different crusts I automatically make for each. In the case of the recipe below, I think it's easy to see why they go together. The touch of mustard and cheese in the pastry are a good fit with the tomato and onion filling.

We're grinding our own flour these days so I often make this with a full cup of whole wheat flour instead of half all-purpose and half whole wheat as listed. When doing that I make sure to use soft wheat berries suitable for pastry. Gives a nice nutty taste and makes a surprisingly filling main course. Of course, smaller, individual pies make a great first course, too.

Tomato-Onion Tart with a Wholewheat Cheese Crust

Tart filling:

3 tablespoons olive oil
2 large onions, thinly sliced
2 eggs, lightly beaten
1 cup ricotta cheese or cottage cheese
3 tablespoons grated Parmesan cheese
2 cloves garlic, minced
1/4 teaspoon fresh ground nutmeg
2 tablespoons finely chopped fresh thyme OR 2 teaspoons dried thyme
3 large firm, ripe, red tomatoes, sliced into 1/4 inch rounds
Salt and freshly ground pepper, to taste

Pastry:

1/2 cup all-purpose flour
1/2 cup wholewheat flour
dash of salt
1/2 teaspoon dry mustard
2 tablespoons grated Parmesan cheese
1/4 cup butter
cold water, as needed

Sift together flours, salt and mustard. Cut in butter and cheese with pastry blender or two table knives until pieces are the size of small peas. Sprinkle 1 tablespoon of cold water at a time over dough and stir in, adding more as needed until dough leaves the side of the bowl clean. (I usually add 4 or so tablespoons but it varies with the amount of moisture in the air and flour, etc.) Place dough in a plastic bag and let rest in refrigerator for half an hour.

To prepare pie shell:

Preheat oven to 400F.

Fit pastry into regular 9" pie pan or to stay true to the recipe name, follow these directions for making a tart shell in a 8" or 9" tart pan with removable bottom:

Place sheet of dough on a lightly floured surface. Roll to a thickness of 1/8". Carefully ease dough into tart pan and gently press it into bottom and up sides of pan. Trim off all but 1" of excess dough.

Fold overhang back into pan and press firmly against sides; this will create a double layer of dough which will reinforce the sides of the shell. Line pastry shell with a double thickness of foil. Bake for 5 minutes. Remove foil and bake for an additional 5 to 7 minutes or until pastry is nearly done. Remove from oven. Reduce oven temperature to 325F.

Filling:

Heat 2 tablespoons of the olive oil in a large skillet, add onions, and cover. Cook onions over medium heat, stirring occasionally, until softened, about 20 minutes. Remove lid and cook until onions are golden and liquid has evaporated. Remove skillet from heat and set aside.

Combine eggs, Ricotta cheese, Parmesan cheese, garlic, nutmeg and 1 tablespoon of the thyme in a medium size bowl. Whisk until well blended.

Spread cheese mixture over dough. Spread onion mixture over cheese. Arrange tomato slices in concentric circles over onion mixture. Season with salt and pepper to taste.

Stir the remaining olive oil and thyme together and brush over tomatoes. Bake in a 325 degree oven for 30 to 35 minutes. Cool slightly before serving.

This is a good way to use up a small amount of ricotta or cottage cheese. I like to make this in the summer when tomatoes are really ripe but it's a good way to use "winter tomatoes," too. Brings out their flavor!

Monday, March 10, 2008

Single-crust Pie Turned Upside Down

In honor of Pi Day (March 14) as celebrated by KitchenParade.com I'm starting off this week with a favorite pie crust and simple apple pie recipe. For more pie recipes check out the challenge at Pi Day -- Recipes for Homemade Pie.

Everyone knows pie crust can be too much of a good thing. It's loaded with fat, even saturated fat, depending on the recipe. Over the years I've noticed a lot of people will leave that bottom crust no matter how tender the dough. It's not always a sogginess issue either, tho that will make the most dedicated pie face leave it behind on the plate.

So I've started following my mother's practice of omitting the bottom crust when making a traditionally 2-crust pie. Say I'm making an apple pie. I combine sliced apples, sugar, a bit of vanilla and cinnamon, maybe a dash of nutmeg and salt, and a pat or two of butter in the pie pan then top with a crust and seal it against the edge of the pie pan. Slash a few vents in the crust and bake as usual.

If I've done a nice job of layering the apple slices and used a variety of apple that holds together prettily when baked, I can remove the pie from the oven, let cool slightly, slice and serve a nicely formed piece of pie. I do this with peaches and pears, too. Berries have more juice and in order to have the slice hold together for serving, I may add a small amount of thickener to the other ingredients. Or I may just let it cool to room temperature instead of trying to serve it too hot and deal with the runniness. That's no different than when I make a regular 2-crust pie.

Some folks call this a cobbler rather than a pie. That's okay. Many cobbler recipes call for a topping other than a traditional pie crust recipe, tho, so I still call this method a pie.

Here's a recipe for a single-crust apple pie. If you can find them, Albemarle Pippins, are great for this pie. Of course, they're great for applesauce, eating out of hand, making cider, and just about any other use you might have for an apple. Rome Beauty or Granny Smith are easier to find and will work, too. If using Granny Smith apples you'll probably want to increase the sugar to the higher amount suggested or even make it an even cup if you really like it sweet.

Single-crust Apple Pie

Makes one 10" pie

Crust:
1 cup all-purpose flour
1/2 tsp. salt
2-4 tbs. cold water
1/3 cup shortening

Sift together flour and salt. Cut in shortening with pastry blender or two table knives until pieces are the size of small peas. Sprinkle 1 tbs. water over part of mixture. Gently toss with fork and push to side of bowl. Sprinkle next tbs. of water over dry part. Mix lightly and push to moistened part at side. Repeat until all is moist. Form into ball.

Flatten ball slightly and roll 1/8" thick on lightly floured surface.

Always use a light touch and handle dough as little as possible.

Apple Filling:

7 cups sliced pared apples
1/2 to 3/4 cup sugar, depending on sweetness of apples
dash of salt
1 tsp. cinnamon
1/2 tsp. powdered vanilla
1/4 tsp. nutmeg, optional
1-1/2 tbs. butter

Preheat oven to 375F.

Combine sugar, salt, cinnamon, vanilla, and nutmeg, if desired. Stir to blend. Layer apples in 10" pie pan and sprinkle with sugar mixture. Dot with butter and place crust over pie. Trim crust and flute edge, tucking it slightly against the inside edge of pie pan to seal. Cut slits in top.

If you like, beat an egg with 1 tbs. water and brush lightly over crust. Sprinkle with sugar. This will give a pretty finish to the crust but is not required.

Bake in preheated oven 45 minutes or until crust is golden brown.

Saturday, March 8, 2008

Hooked sampler mat

Today I pulled out my Ashford Country Spinner to start working up some roving from Abby, our Jacob ewe. When I prepared to run the leader through the orifice*, I found my lost rug hook (see previous post). It was stuck through the hole along with a strip of black wool. No wonder I couldn't find it! The handle is the same color as the wheel and I'd never put it there so never thought to look there. DH thought I might be right when I asked if he put it there. For safekeeping, he said. Uh huh.

So the way my mind wanders, I went from sitting down at the wheel to working on the border of my hooked sampler. It was just as well since we've had strong winds of 25-30mph all afternoon and into the night. 
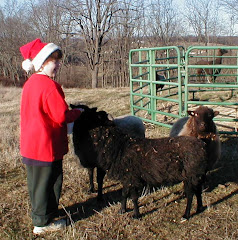
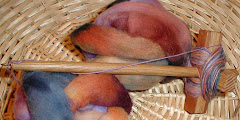
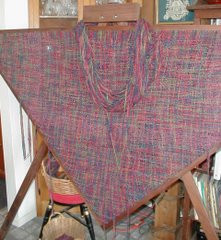
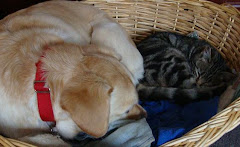
Holly dog likes to be close to her humans when bad weather hits. She usually squeezes under my chair when she hears the least rumble of thunder and with gusts up to 60mph, the windows are whistling and rattling to beat the band. This way I could pull the rug frame right up next to her basket so we were both comfortable. She doesn't like a spinning wheel near her when it's in motion.

Holly dog is looking especially clean today as she wallowed in the mud this morning and had to have a bath before lunch. Fortunately it wasn't windy then and the outdoor temperature was almost 60F. so DH gave her a bath in the washtub on the back deck. Holly is not known for appreciating bathtime and we've learned the hard way not to attempt to bathe her in the bathtub. It's either the back deck or the garage for Holly's ablutions.

I set out to make myself a sampler to show how different weave patterns will look when hooked. Since I like functional samplers, this one is destined to be a mat on the top of a little 4-drawer dresser I use as a side table in the living room. It's proving very helpful as several of the fabrics have turned out different from the way I imagined they would look when hooked. Good to know when I start planning my next hooked projects.

The hooking frame by The Purple Crow was a Christmas gift from my mother-in-law a couple of years ago. I also received another base that lets me support the frame above my lap if I'm sitting in a chair where use of the floor frame is impractical. The head frame has stainless steel grippers on all four sides that make repositioning easy but hold tight while hooking.

I especially like the way I can maneuver the frame around chair legs and even the footstool while not having to worry about frame legs to the side getting in the way. I have a needlework scroll frame (think small quilting frame) that I like but it's only useful if I want to sit in a straight kitchen table-style chair. Even the narrow wingback chair I favor in the living room won't allow me to pull that frame close-in while I work.

Hoping to finish this mat before next weekend so I can start another hooking project -- perhaps a top for my large footstool or chair pads for the kitchen chairs. I keep vacillating between traditional rug hooking and locker hooking. There are four main chairs and several extras we only pull out as needed. Maybe I could make a different type of pad for each?

Well, that's the least of my worries right now. I just need to concentrate on finishing this sampler.

*Are both the openings termed the orifice? I've always called the one to the front where the fiber enters (perpendicular to the floor) by that term but when I went to describe it here I was caught up short. The hook was in the opening behind that first entry point. The second orifice?