Sunday, July 12, 2009

Another marinated summer salad -- this time with homemade Catalina dressing

The days of the week blur together lately. I put up 19 quarts of green beans, 15 quarts of pickled beets, dried 8 pounds of beets, 16 pounds of various types of summer squash, 9 pounds of cucumbers and more this past week. I swear the corner of the kitchen in this photo is never empty. As soon as I take care of one dishpan of vegetables, another seems to magically fill and take its place.

To get us through busy weeks like this, I rely on make-ahead dishes and "twice is nice" menus. The latest addition to my cookery repertoire is a marinated salad that can be made in advance, uses up lots of garden produce and makes a great side dish or topping for use with a tortilla roll-up and which, with the addition of chopped cooked chicken, sliced hard-boiled eggs or a can of rinsed and drained beans, can serve as a main dish.
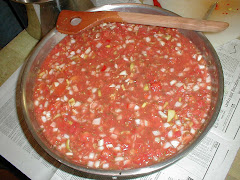
For one of our completely local meals this week I included this salad, topped with hard-boiled eggs and accompanied by zucchini chips and a glass of mint tea. All but the tomatoes came from our homestead and those came from the local farmers' market. Next week when I make another bowl, I'll add a couple of our just-ready peppers, either bell or sweet banana.

The dressing I use is a homemade Catalina. You could use a bottle from the store but I don't because the homemade is so easy to make and it has the spicy tang I can't find in a bottled version these days.

The recipe allows for a lot of variation. Just be sure to use fresh vegetables that won't go limp sitting in the dressing. For that reason, I prefer to use a meaty plum tomato and remove the seeds before chopping. Chop as much of each vegetable as you want to include. I don't measure but just use a bowl that will hold a little more than I want to make. That way I have room to toss the salad in the dressing without spilling it. When I have enough veg chopped, I pour on the dressing, toss to coat then cover and refrigerate till serving time. It needs at least an hour or two to blend flavors before serving. Leftovers will keep 3 days or so in the fridge.

Catalina Dressing

2/3 cup mild-tasting vegetable oil
1/4 cup ketchup*
2 tablespoons honey (or 1/4 cup sugar)
1/4 cup white wine vinegar
1 tablespoon grated onion
1/2 teaspoon Worcestershire sauce
1/4 teaspoon salt
1/8 teaspoon hot pepper sauce

Combine all ingredients in a jar with tight-fitting lid. Shake to blend and then let sit for an hour or so before using. Shake thoroughly or use wire whip each time before serving.

Makes about 1-1/2 cups.

*I use Farm Journal's "Western Gourmet Ketchup" which I can every year using our garden tomatoes. (Recipe available here.) It has a sweet tangy flavor and works well in this recipe but probably any flavorful bottled ketchup would serve.

Wednesday, July 8, 2009

Making apple cider vinegar

It's a little early in the year here to be thinking of making cider but we're using a lot of apple cider vinegar for pickling and salads these days so now's as good a time as any to explain the process for turning non-pasteurized apple cider into vinegar.

First thing to know about making your own vinegar is that you shouldn't use it for canning unless it has an acidity level of at least 4.5% and some canning recipes call for 5%, which is what many store-bought jug vinegars say they have. However, there's no need to test the acidity level if you just want to use it for salad dressings, regular recipes or other general household use.

Next thing is, the directions I've included here are how I do it. There are lots of variations that will yield similar results. And there are vinegar connoisseurs just like with wine. So try my method if you want but look around and you'll find other ideas on how to do it and what to use. Vinegar can be made from almost any liquid that contains enough sugar so don't stop with apples -- experiment with grapes (how about making wine vinegar?), peaches, beets, berries or what have you.

If you press your own apple cider, you're well on your way to making vinegar but if you buy it, be sure to choose non-pasteurized cider. Also, check the label to be sure it's preservative-free. Many cider mills add sodium benzoate as a preservative and that can make it less likely that your cider will ferment or turn into hard cider which is the first step in making apple cider vinegar.

When I make vinegar, I set aside a couple gallons of cider in crocks. I make sure to leave lots of headroom in the crock as the cider will be frothy and may foam over the top during the first fermentation stage. There's nothing wrong if it does this -- just wipe the crock off and let it continue to sit -- but it can be messy and draw fruit flies. So I use a 2-gallon crock to hold 1-1/2 gallons of cider. I cover the container with a clean cotton tea towel, tying it with a piece of string so dust and bugs can't get into the crock over the next few months.

As the sugar in the cider changes to alcohol, it becomes hard cider. That can take anywhere from 1 week to 6 weeks, depending on the temperature and the sugar content of the apples used to make the cider. Some people choose to hurry this stage along by adding yeast but I prefer the easy path and just set the crock in a corner of the pantry for several months.
If I have a mother-of-vinegar (pictured above) from a previous batch of vinegar I may carefully pour that into the crock, on top of the vinegar, to help the process along but wild spores floating in the air will start the fermenting process, too. Check the cider after a few months to see if it's strong enough. The process usually takes from 4 to 6 months, start to finish. And that's all there is to it.

If you do want to use homemade vinegar for canning, this link offers a good description of the steps for vinegar titration. The process is similar to testing the acidity level of wine. But, again, if you don't plan to use your vinegar for canning you don't have to bother with this. Just go with vinegar that tastes and smells good to you.

Monday, July 6, 2009

Sweet pickles or how to use up a few cucumbers


My mom always made 14-day pickles and I still make them but they take so long I try to can enough to last a couple of years. So on the "off" years I've been making Helen Witty's bread-and-butter pickles with onions from her "Fancy Pantry" cookbook. We really like their sweet crunch and any extra pickling juice goes over a jarful of sliced onions that I stash in the fridge for use in salads or on sandwiches.

This weekend I put up 25 pints of bread-and-butter pickles minus the onions as these jars are intended for my mother's pantry instead of ours. She doesn't do much canning anymore but likes to keep her pantry shelves full of good things my sister or I have put up.

The recipe is easy and though timing plays a part, it doesn't require a do-or-die schedule. Also, I use Witty's ingredient list as written but I play fast and loose with the directions because I rarely have ONLY a dozen cucumbers ready for pickling at one time. I most often prepare my cucumbers by washing, slicing and putting into a clean food-safe 5-gallon plastic bucket. Pour clean water by measured gallon over the cucumbers and then pour the water off and mix up lime and water as needed to cover cucumbers using Witty's proportions of 1 cup pickling lime to 1 gallon cool water. And add the sliced cucumbers to the lime-water mixture. This way I'm sure to have enough water to cover any amount of cucumbers I have on hand.When it comes time to mix up the pickling liquid, I multiply the ingredient amounts so the yield will be about two-thirds of the amount of water required to cover pickles in the first step. If I have any liquid left over after canning, I pour it over onion slices and store the mixture in the fridge to use fresh.

Extra-Crisp Bread and Butter Pickle Slices
from "Fancy Pantry" by Helen Witty

12 firm, fresh pickling cucumbers (6-inches long)
1 gallon cool water
1 cup pickling lime
64 ounces apple cider vinegar
5 cups sugar
1 tablespoon fine non-iodized salt
1 tablespoon mustard seed
1-1/2 teaspoon celery seed
1 teaspoon turmeric
1 teaspoon whole peppercorns
1/2 teaspoon whole cloves
1/4 teaspoon ground ginger
1 quart of sliced onions, cut 1/4-inch thick

Wash cucumbers. Cut off and discard both ends, then cut cucumbers into 1/4-inch thick slices.

Measure cool water into a ceramic, stainless steel or other non-reactive container (do not use an aluminum container) and stir in the pickling lime very thoroughly. It will not dissolve completely. Add sliced cucumbers, stir, cover, and set aside overnight or for up to 24 hours. Stir them once or twice.

Drain the cucumbers into a colander. Return them to the rinsed out container and rinse them in three more batches of cool water, stirring them well as you do so. Drain them again and add cool water to cover them by an inch or two. Set them aside for three hours.

Combine the vinegar, sugar, salt and other seasonings in a non-reactive saucepan. Heat the mixture to boiling, stirring until the sugar dissolves, then boil it, uncovered, for 5 minutes.

Meanwhile, drain the cucumbers well and return them to the first container along with the sliced onions. When the syrup has boiled 5 minutes, pour it over the slices. Stir the slices gently, then push them under the surface, cover the bowl with a towel, and set it aside overnight.

Transfer the cucumbers and syrup to a large preserving pan and cook the whole business, covered, over medium-high heat, stirring occasionally (be careful not to break the brittle slices), until the cucumbers are translucent, 20 to 30 minutes.

Using a funnel, spoon, long fork or tongs, arrange the pickle slices in 8 hot, clean pint canning jars, leaving about 1/2-inch of headspace. Divide the spices from the syrup among the jars, then add boiling-hot syrup to reach 1/4-inch from rims. Remove any bubbles and add more syrup, if necessary. Seal the jars with two-piece canning lids and process for 10 minutes in a boiling-water bath. Cool, label and store the jars. Be sure to let the pickles mellow for 4-6 weeks, then chill before opening.

If you're new to canning or using the water bath method, please refer to the latest Ball Blue Book of Preserving or the USDA-funded website, National Center for Home Food Preserving, for detailed directions.

Besides pickles, I put up cucumbers by drying them. They make a tasty vegetable cracker substitute similar to zucchini chips -- DS even prefers the cucumber chips to the zucchini chips. And they are wonderful to use for making cucumber dip. Just grind up a couple tablespoons of dried cucumber slices and add the powder to sour cream, yogurt, cream cheese or your favorite blend of the same. It also makes a delicious cucumber spread for sandwiches in the middle of winter.

Sunday, July 5, 2009

Lunch in a hurry, as usual

The garden's doing great this year and that means when we're home we're usually working out there or in the kitchen putting up produce. Strange as it seems, amongst all this food, it can be hard to get a meal on the table some days.

Saturday's meal, put together on the run between garden chores and a little holiday merry-making, was meatloaf made with local, grass-fed beef from the freezer, red cabbage and summer squash from our garden, grain from down the road in Raphine (Wade's Mill) and a few new potatoes I couldn't resist picking up at the farmers market that morning. The squash casserole and rolls included eggs from our backyard hens, plus butter and a bit of top cream from a dairy at Burnt Chimneys. The meatloaf and squash also included onions from the garden and the meatloaf utilized a few tablespoons of the wonderful tomato powder I made earlier this spring with what was left of last year's dried tomatoes. Red cabbage required a dash of homemade apple cider vinegar and local honey, too.

Too get it on the table fast, I prepared the squash casserole in the morning and refrigerated it, unbaked, till close to lunch time. The red cabbage went in the oven with the meatloaf a little over an hour before lunch. And the rolls were made with refrigerator dough I try to keep on hand so we can enjoy fresh hot bread with most meals. They spent most of the morning rising in their baking pan on the counter and then went into the hot oven as the meatloaf and squash casserole came out.

We had ice-cold apple cider we made and froze late last fall. I often can cider, too, but then it just becomes apple juice, in my book. This stuff was still the real thing and a perfect sweet yet refreshing drink to go with the rest of our local meal.